Your Ubuntu won’t launch after installation? I have at least 3 solutions that I personally used to solve the problem.
You have heard about Ubuntu 20.04 LTS (or newer lts) and are trying to install it on your machine.
The problem is that after installation, your new Linux does not launch after installation.
In this post I provide at least 3 solutions that I used to solve the problem.
Ubuntu won’t boot after install ? 3 solutions that work
Solution 1
The first solution is to disable the “secure boot” mode of your machine . Your ubuntu distribution may work fine during testing. The problem occurs after the complete and permanent installation on your hard drive.
What happens is that a black screen appears when launching with nothing displayed.
From experience this has already happened to me on my ASUS ROG GL552VX machine.
The solution that worked was disabling “secure boot” mode in BIOS.
In my case it was found by following this path security -> secure boot menu .
The Bios being different depending on the machine, yours could be located elsewhere.
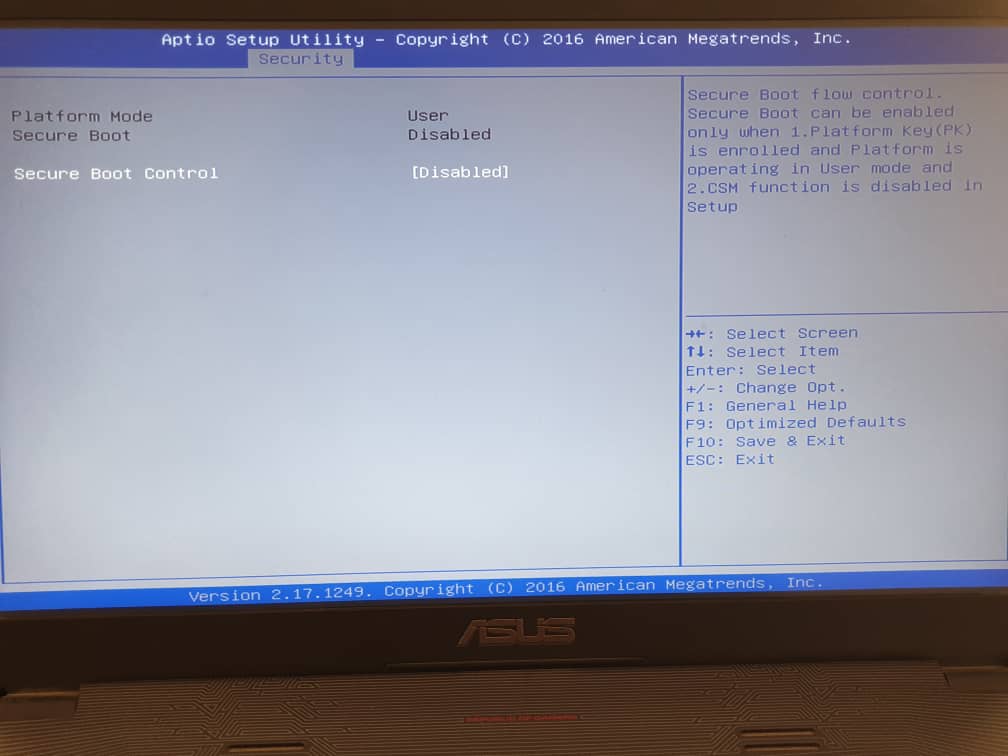
What is the “secure boot” mode used for?
You would tell me what is the use of “secure boot” apart from preventing us from installing what we want?
This BIOS option, often enabled by default, ensures that only software officially approved by the manufacturers can run on your machine.
One of the advantages is being able to prevent viruses and malware even unknown to antiviruses from launching into your computer.
Normally you have nothing to fear if you are on Linux.
When should it be used?
This kind of problem often happens after installing a linux distribution. This BIOS configuration is enough to solve your little problem.
Very often before installing a distribution, we test it by starting it from a USB key or other memory medium.
In some machines like mine, live booting from a USB stick fails to launch linux in live mode.
Our ASUS ROG had exactly the same problem.
This leads to the second solution.
Here is how we went about solving this problem during the installation of Ubuntu (version 16.04 LTS at the time).
Solution 2
The second solution is to add “nomodeset” in the ubuntu boot configuration file.
Sometimes, when you boot a USB key in order to start Linux from it, the distribution does not launch.
There are 3 causes that can be deduced from this behavior. The ISO file of the distribution is badly downloaded (less plausible), the key is badly booted (more plausible) and the kernel launch option is not appropriate (less obvious).
The first two causes of the problem are easy to verify, unlike the last one.
To configure the boot option of your Linux you must:
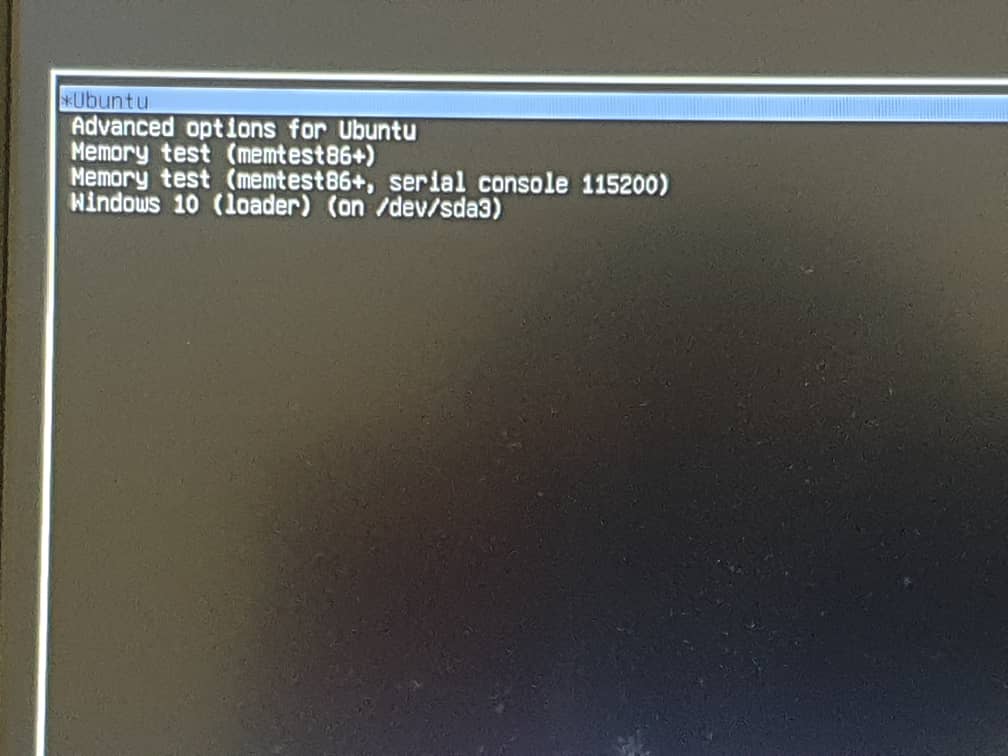
- At the boot menu similar to the image above press the “e” key.
- In the terminal that appears, add “nomodeset” to the end of the linux line. Usually it is in the form linux /boot/vmilnuz-<version> root=UUID= … quiet splash …
- After modification, the line should look like this linux /boot/vmilnuz-<version> root=UUID= … quiet splash nomodeset …
- type f10 or ctrl-x to boot your linux distribution with this configuration.
This is what I used to try Ubuntu 16.04 LTS on ASUS ROG GL552VX.
This trick may work for linux distributions like Ubuntu 20.04 LTS (tested distro).
When should it be used?
This option is often required for machines with NVidia cards. This trick is also used when you can’t launch a Linux distribution from a USB key or other bootable media.
Normally after trying the distribution, you can easily install and start it without any problems.
If when starting Linux you do not find anything displayed, check if solution 1 (disable “secure boot” mode ) is executed.
If this is the case, it would be time to move on to the next solution which is a variation of the current solution.
Install graphics card drivers
At startup, when you reach the boot menu, instead of directly launching Ubuntu or your favorite Linux system, you must apply the previous solution by adding the “ nomodeset ” instruction when launching the Linux kernel.
Your system should boot normally.
If Ubuntu or your Linux distribution is running, that’s a good sign. At this point, you’ll have two choices to resolve the problem once and for all. The first one is the one we recommend: install your video card drivers.
To understand the reason, check out the “ Why does this solution work? ” section towards the end of the article.
After installing the drivers, you just have to restart your Linux normally.
If the problem persists despite installing your graphics card driver, repeat the procedure of adding the “ nomodeset ” instruction to system startup.
From the desktop, the second solution would be to add the “nomodeset” instruction again . This time the instruction will be executed automatically every time the kernel boots. Which brings us to solution 3.
Solution 3
The third and final solution will allow us to add “nomodeset” permanently.
You have probably noticed that your configuration resets every time you restart the machine.
To prevent this from happening, you need to add the “nomodeset” instruction permanently and once and for all.
Here’s how it’s done in practice.
- Open the terminal and type “sudo gedit /etc/default/grub”
- Enter your password
- Move your cursor to GRUB_CMDLINE_LINUX_DEFAULT=”quiet splash”
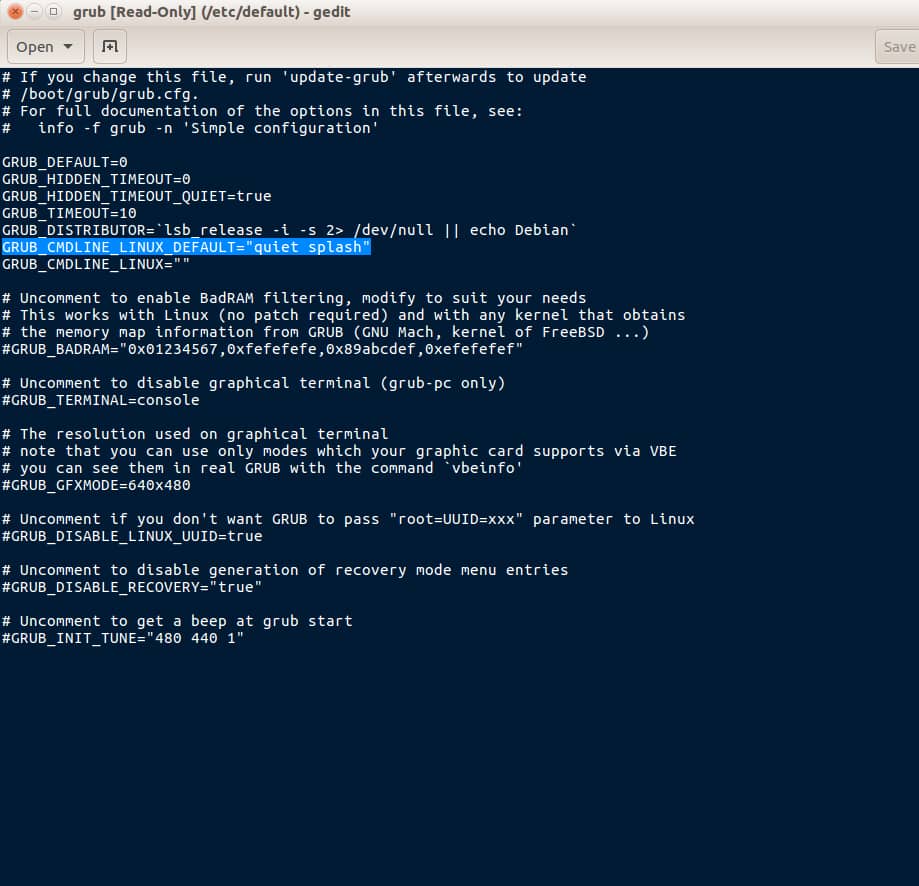
- Add the nomodeset line at the end of “ quiet splash ” like this: GRUB_CMDLINE_LINUX_DEFAULT=”quiet splash nomodeset”
- Save and close the window
- In the terminal type “ sudo update-grub2 ” and validate with the Enter key
When you are done you can now turn off and on your Linux OS normally.
Why does this solution work?
With older Linux kernels the GUI configuration was in the video card drivers used by the X server.
The latter is responsible for the operation of the graphical interface of any Linux distribution. Today, the configurations of the graphical interface are programmed directly into the Linux kernel.
The latter can directly configure the X server without going through the drivers during system startup.
This allows distributions to display a high-definition splash screen and transition smoothly to the login screen.
Which was not possible in the past.
Unfortunately, some graphics cards do not support the brand new Linux kernel operation, especially in live mode .
Which explains why live booting does not launch linux with default configurations.
What we did to solve this solution, is to tell the linux kernels not to load the video drivers and instead use BIOS mode until the X server is loaded.
This is what the “ nomodeset ” instruction accomplishes.
Of course it is only temporary until we add it to the bootloader configuration file called GRUB. Then we apply the update with the instruction ” sudo update-grub2 “.
This is what we applied in this solution section.
Personal note
Our machine, the ASUS ROG GL552VX also has an NVIDIA video card.
To successfully install Ubuntu 16.04 LTS at that time, we used solutions 2 -> 1 -> 2.5 respectively.
Since then, the only update we apply is that of the Linux kernel .
It is not known how things will be with the most recent Linux distributions. However, we believe that the solutions in this troubleshooting article may be useful.
Source
If you liked this post, do not hesitate to subscribe to our Newsletter to receive more exclusive content and above all take advantage of good deals.
Let’s stay in touch!
